Pages

Wednesday, 30 September 2015

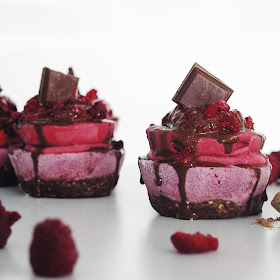
Double-Decker Raspberry and Chocolate Cheezecakes.

BEHOLD....THE DOUBLE-DECKER, RAW VEGAN, REFINED SUGAR FREE, OIL FREE RASPBERRY AND CHOCOLATE CHEEZECAKE.


These. Are. The. Goods.

I mean just look at them. They look delicious. I can verify (through copious consumption of them) that they taste delicious.


These came to be because my friend Annabel (hi there if you're reading) gave me a block of Loving Earth's Raspberry Chocolate. I've always wanted to try the chocolate's from Loving Earth but as a uni student who has just moved into an apartment and had to furnish said apartment, I couldn't justify spending the money on chocolate. But, when that chocolate is a present - well, go to town my friend!!

So, taking the chocolate and its raspberry flavour as my inspiration, adding in a whole heap of raspberries (YUMMMMM), some cashew nuts, and a few other things, these eventuated and they're mighty good if I don't say so myself!!!

Ingredients;

The Base
1 cup raw hazelnuts
1/2 cup raw almonds
12 medjool dates
2 tbsp rice malt syrup
2 tbsp raw cacao powder

1. In a blender, combine all of the above until you have a mixture free from large chunks of nuts. This can take a few minutes an you might need to scrape down the sides of the blender.
2. Take a muffin tin and some baking paper (parchment). Cut the baking paper into thin strips, approx. 2cm wide. Lay the strips across the whole in the muffin tin so they form a cross. You will use these as little handles to remove the cheezecakes from the tin when they're frozen.
3. Take a spoonful of the base mixture and mould it into the muffin tin hole so that the mixture forms a flat, and properly pressed down base. A spoon can be helpful to press the mixture firmly into the tray, otherwise clean hands work well. Repeat until you have no base mixture left and then place in the freezer whilst you make the filling.


The Filling
1 1/2 cup raw cashew nuts
200ml coconut milk (from the can, it's extra creamy!)
2 tbsp pure maple syrup
2 tsp vanilla bean paste (or 1 vanilla bean)
1 apple, peeled and cored
1 1/2 cups fresh or frozen raspberries

1. Soak the cashew nuts in water overnight. In the morning drain them and place in the blender along with all the other ingredients, keeping aside 1/2 cup raspberries. Blend this really well. Like I'm talking for at least 5 minutes, even more. The longer you blend, the smoother your mixture will be, and that makes for a better result.
2. Take 1/3 of the blended mixture and blend the extra 1/2 cup raspberries into that mixture. Then, set aside in a covered bowl in the fridge overnight.
3. Remove the muffin tin with the bases from the freezer. Using the 2/3 of the remaining mixture, pour the filling into the muffin moulds, using all the mixture. If you have any leftover, add that to the 1/3 you set aside earlier. Return the now full muffin tins to the freezer, making sure the ti is flat as to avoid lopsided cheezecakes. Freeze overnight.
4. If you have shallower muffin tins, as I did, the following morning I removed the bases and level one of the cheezecakes from the moulds, repeated the step with the parchment and then poured the 1/3 of the mixture I had set aside into the tins and froze that overnight, keeping the base and layer one in a covered container in the freezer also. This worked well as I kept a tiny amount of mixture in the fridge to use as 'glue' the next day to stick the two layers together. Otherwise, if your tins are not full, simply pour the second layer on top and freeze again overnight.

To serve, I added a dollop of raw raspberry jam (blended raspberries, chia seeds and rice malt syrup) on top, then some raw chocolate (equal parts rice malt syrup to raw cacao powder) and then topped with a square of the Loving Earth chocolate, but presentation is the fun, creative part, so be inventive!!!



Wednesday, 23 September 2015

Toast Toppings 101.


I bloody love toast. Like, I love bread alone, but toast is the actual next level. Just thinking about toast right now is making me salivate, and I literally just ate some toast, so it's not like I've deprived myself and its only a craving...

A lot of people think that bread is the enemy of all enemies and ought to be avoided and basically I have one thing to say to these people; you're all fools!!! Sure, you probably shouldn't go out and chow down on a whole loaf of bread, but, like everything, in moderation there is nothing bad about bread. That said, there are certainly better breads for you, and I would highly recommend that you steer clear of the conventional white bread. These days, eating fancy food is incredibly popular which has the delightful flow on effect of it now being common to see all manner of fancy and sophisticated foods in the humble supermarket. For example, my favourite bread is Helga's Quinoa and Flaxseed. If you'd mentioned quinoa or flaxseed a few years ago you would absolutely have been laughed at, but, here we are in 2015 and that's so blasé that it isn't funny. The upside of all this is that quinoa and flaxseed bread is delicious, its super good for you and makes the perfect base for some creative and inventive toast toppings!

Gone are the days of plain peanut butter (although I'm always up for some plain PB). Instead, these days its all about looking in your fridge and pantry and taking every single ingredient you spot and putting it on a toasted piece of bread and then challenging yourself to eat it. Here's some of my favourite creative and super delicious toast toppings.


My Toast Topping Recommendations; (and I'm a real connoisseur so you should trust me)

Combo #1
Crunchy peanut butter
Sliced banana
Chia seeds


Combo #2
Homemade coconut yoghurt
Fresh blueberries
Passionfruit


Combo #3
Almond butter
Fresh strawberries
Coconut Flakes


Combo #4
Homemade coconut yoghurt
Raspberry and Chia jam (recipe on its way soon!)
Frozen raspberries


Combo #5
Hummus
Spinach
Sliced spring onion/shallots
Snow pea shoots
Coriander/Cilantro
Cracked black pepper


Combo #6
Sliced avocado
Sliced red onion
Sliced tomato
Dukkah (a Middle Eastern spice mix available in most supermarkets)
Cracked black pepper


Who said toast was boring?! 


Friday, 18 September 2015

Chocolate Chia Pudding Parfait with Caramel Peanut Sauce.


Let's just start by saying wow.

Friends, I would like to introduce you to a not-so-little something that will have you questioning your very existence. Behold, the Chocolate Chia Pudding Parfait with Caramel Peanut Sauce. This parfait, aside from being a bit of a mouthful to get out, is quite possibly the best thing that I have ever eaten or made in my life. Yes, you read that correctly. This one takes the cake.

I was going to write a long and wordy description of how much deliciousness this bad boy has, but I have a 3,000 word essay to write, a German assignment to do, I'm about to head off for a sesh on the exercise bike and also because I think a picture says 1,000 words, so I've included a multitude just to reinforce the fact that this is DELICIOUS.

If you're sitting there asking whether you want/need this, then let me answer for you. Yes. Yes you do need this. 110% you need this. Do it. DO IT NOW!


Ingredients;

The Chia Pudding
3 tbsp chia seeds
1 cup coconut milk (from the long life milk section, not the can)
1 tsp pure vanilla bean paste/1 vanilla bean
1 heaped tbsp raw cacao powder

1. Combine all of the ingredients in a bowl. You will need to mix things really well because it is likely that the cacao will not be so cooperative in combining with the liquid. Fear now however because with perseverance it will mix in!
2. Place in the fridge overnight.


The Caramel Peanut Sauce
2 tbsp pure peanut butter
1/2 cup coconut milk (from the long life milk section, not the can)
4 medjool dates, pitted

1. In a blender, combine all of the ingredients and blend on high speed for a few minutes, or until really well combined with no chunks of date!
2. Pour/scrape/spoon out of the blender and into a container. This sauce can be made the night before and stored in an airtight container in the fridge should you wish to cut time in the morning.

To Assemble;

To assemble your parfait, in the morning remove the soaking chia seeds from the fridge. They will have expanded and should now form a strangely gooey pudding. Stir the pudding again really well before serving just to combine things really well. Take a jar/glass and spoon in some of the chia pudding, and then the caramel peanut sauce. I also used some homemade rawnola (recipe on its way) and make a raw, oil free chocolate drizzle (also recipe on its way) to go in as well, although this tastes 11/10 anyway, so you don't really need the add ins!

Other layers could include raw cacao nibs, my chocolate and hazelnut granola (however the pudding will then not be fully raw), banana coins, fresh berries - the options are endless!!!


Tuesday, 15 September 2015

Rice Paper Rolls with Tamari Marinated Tofu.


Confession - I had never cooked tofu until about 2 weeks ago when I suddenly found myself bored, with a 3000 word essay to write (thus a great need to procrastinate), hungry and feeling somewhat adventurous. I should probably also mention that until about a year ago I had a huge, deep, pathological fear of tofu. This probably sounds really stupid, and to be honest in hindsight it completely is, but as a child and oblivious teenager nobody could ever accurately tell me what exactly was in tofu and, having a fear of the unknown, tofu was added to the list of weird and scary things. Since becoming a vegetarian, and later a vegan, I've become increasingly open to new things in the food that I eat and cook and, after two trips to Asia in the past 8 months,  slightly more experienced consumer of tofu. But, there's tofu and then there's good tofu and the two are very, very different in taste, with the latter being downright delicious. The trick to the perfect tofu is that you have to;
1. Dry it out well.
2. Marinate it for at least a day, even two.
3. Cook it with a cornflower coating in a little bit of sesame oil.

Without following these steps, you'll inevitable end up with a non-crispy, tasteless and soggy mess, which sounds gross and also tastes gross (I know courtesy of a small kitchen disaster). But, lucky for you it was I that made the disaster in the kitchen and you get to reap the benefits of the lesson learnt when messing up!

In case you too are unsure of what the heck tofu actually is, it's basically just coagulated soy milk pressed into soft white blocks and is also known as bean curd. It originated in China and is over 2,000 years old (that's real old just in case you were unsure). Nutrition wise, tofu has a low calorie count and is high in protein and iron (yay for vego/vegan iron!!). Tofu is also proven to low cholesterol and the risk of heart disease. When making a dish with tofu, and a whole heap of fresh, raw vegetables, you basically end up with a delicious, relatively easy to prepare, super healthy, and mega yum dish. Winning.


Ingredients; 
(makes 6 rolls)

125gm tofu
4 tbsp tamari (or reduced salt soy sauce - but use tamari if you're gluten intolerant)
Approx. 4 tbsp cornflower
2 tbsp sesame oil
9 pieces rice paper (three of them snapped in half)
1 cup finely chopped green cabbage
2 spring onions (shallots)
1/2 carrot (grated or cut into thin strips using a julienne peeler)
1 cup bean shoots
1/4 red capsicum
Handful fresh mint leaves
Handful fresh coriander (cilantro) leaves
Handful snow pea shoots

1. Remove the tofu from the packaging. Use a sharp knife to slice the tofu into pieces approx. 0.5cm thick and 2cm wide - at least 6 pieces. Take a plate and lay some absorbent paper towel on the plate. Lay the pieces of tofu onto the towel and cover with another piece of absorbent towel. Place this in the fridge for about two hours with something heavy sitting on the top (i.e. a skillet or bottle of milk, etc.). Using something heavy is important in helping to drain the tofu of any excess water which will inevitably be stored in the tofu from its packaging. Soggy tofu will never go crispy and will not absorb flavour as well as properly drained tofu.
2. After two hours retrieve the tofu from under previously mentioned heavy object. Grab a container that has a lid and lay the tofu strips into the container, then pour the tamari over the top. Depending on how large your container is you may need more tamari, because you should use enough to cover all the pieces so that they all absorb some of the sauce. Place the lid on and put the container in the fridge for at least one day, although I would recommend two days.
3. When the tofu has properly marinated, remove it from the fridge. On a chopping board, sprinkle the cornflower generously. Taking one strip of tofu at a time, cover it well in the cornflower, before gently dusting off any excess. Repeat for all the strips.
4. Take a fry pan and place it over the heat. You want quite a hot pan, so turn the heat towards the higher end of the spectrum. Pour approx. 2 tbsp sesame oil into the pan and allow to heat. To check whether the pan is hot enough, flick some water into the pan and if the water sizzles and spits, then you're good to go! Do not use olive oil as it doesn't handle such hot temperatures as well as sesame oil (coconut oil is also another option that will work well, although you will end up with quite a different flavour). Carefully place all of the strips into the pan and cook for a minute or two on each side until they are a light golden brown. When cooked, remove from the heat and place on a new sheet of absorbent towel to remove any excess oil.
5. Take the cabbage, shallots, capsicum and snow pea shoots and chop them up into thin strips/smaller pieces/down in length so that they will fit in a roll that is approx. 10cm long. Lay them out on a chopping board along with the carrot, bean shoots and fresh herbs so that you have an organised assembly line.
6. Take a sheet of rice paper and wet it in a bowel of cold water for a minute or so (or according to packet instructions). Carefully shake away any excess water and lay out on another chopping board. Repeat for one of the half sheets and then lay that half sheet down the middle of the full sheet, thus reinforcing the main sheet. Then, lay down a piece of tofu, and a selection of fresh veggies. To roll the finish roll, take the top side and fold it over the filling as far as possible. Then fold in each of the sides and finally the bottom piece, carefully picking up and tilting the roll back in on itself to get a tighter roll. Lay on a tray with a damp piece of paper towel underneath to prevent them from drying out. Repeat for all 6 rolls.
7. Serve with some sweet chilli sauce or a peanut dipping sauce (pure peanut butter and some water to desired consistency). Then, devour these bad boys with such gusto that you would scare off any would be food thief cause these are too good to share!!!


Wednesday, 2 September 2015

Coconut Yoghurt.


Coconut yoghurt, affectionally dubbed 'coyo', is a fridge staple for me and something that I use in a lot of my recipes, as well as enjoy eating at the main affair itself.

The great secret to good coyo is that you need to clearly and definitely separate the coconut cream solids from the liquid. Good news is, there's a super duper easy way to do that - simply put the coconut cream cans in the fridge for a minimum 24 hours, though preferably a few days. The longer you leave them sit, the better the two parts of the cans contents will separate and the better your coyo will be!

Aside from tasting like a tropical paradise, coconut is highly nutritious and rich in fibre, vitamins C, E, B1, B3, B5 and B6 and minerals including iron, selenium, sodium, calcium, magnesium and phosphorous. Coconuts are also one of the highest sources of electrolytes in nature. As someone who runs most mornings, it's really important for me to replace all those lost electrolytes (otherwise I do not recommend crossing paths with me later that day!). I eat some kind of coconut almost every single day for breakfast, but coyo is absolutely my favourite way of having coconut. In the shops, coyo can be extremely expensive (not to mention, rather dubious tasting at times...), and as a student, I certainly cannot afford to sustain my coyo addiction if I were not to make it myself. Luckily, the homemade version requires only two ingredients and, if you take the time to separate the two parts correctly, is actually surprisingly easy!

I like to eat my coyo along with some crunchy Macadamia, Pecan, Apple and Sultana Granola, along with some homemade raspberry chia jam and fresh fruit! That friends, is what you might fancy calling a 'match made in heaven'!!


Ingredients;

2 400ml cans full fat coconut cream (do not buy the low fat version or this won't work!)
3 tbsp pure sweetener (maple syrup/agave syrup) 
1 tsp vanilla bean powder/paste 

1. Buy your coconut cream and when you bring it home, put them in the fridge for AT LEAST 24 hours. The longer the better! (I frequently have mine sit for weeks before using them!)
2. After the cans have sat refrigerated for long enough, remove them and open. You should find that the top half/three quarters of the can is made up of a mostly solid, creamy white stuff. That's the part you need. Use a spoon to carefully scoop that solid part out, leaving behind the coconut water that will be at the bottom of the can (you can use it in smoothie's later!). You can scoop the mixture into a bowl and use an electric mixer to combine (this is the better option), or also into a blender if you please.
3. Add the maple syrup and vanilla and mix/blend for a minute or until well combined. 
4. Pour into a jar and refrigerate overnight before using. EASY. PEASY.