Friday, 29 April 2016

Blueberry and White Chocolate Cheezecake. 


A few months ago I received a lovely, lovely gift from the team at Power Superfoods that contained, among various other things, some cacao butter. I've wanted to experiment with cacao butter for so long, but I've never quite had the chance or always seemed to forget to buy some when I was at the health food shop! But, as always, Power Superfoods were there to make my wildest food dreams come true.

Cacao butter is the edible natural fat of the chocolate bean, cold pressed to retain its nutritional properties and delicious natural aroma and flavour. Generally speaking, it is the core component of all chocolates, and, as I like to think of it, (when melted) liquid gold (coincidently also the colour it goes when you do melt it!).

You're likely freaking out because here I am openly stating that cacao butter is a natal fat and *note sarcasm* obviously all fats are bad and you may die if you eat some. WRONG. In actual fact, naturally occurring saturated fats, i.e. those in cacao butter, are a crucial part of a healthy and wholesome diet as they are needed by the body to keep skin and hair quality good, naturally regulate hormones and aid fertility. Natural saturated fats are entirely irrelevant to cholesterol and weight gain. Additionally, cacao butter is a great source of Vitamin E and has a unique composition of the essential fatty acids Omega-6 and mono-saturated Omega-9. It's so important to recognise that not all fats are bad, fats are an essential part of a healthy diet and that cacao butter is a perfect way to have your chocolate and eat it too!!

*N.B. Cacao butter is available at most good health food stores, or online. It is relatively inexpensive.


Ingredients;
The Base
1 cup raw macadamia nuts
1 cup raw almonds
12 medjool dates, pitted

1. Blend the above ingredients in a blender or food processor until a kind of 'dough' forms - the mixture should be sticky and hold its own when rolled into a ball. If it is too dry, add in some additional medjool dates.
2. Take a lined cake tin (I used a square one) and pour the base into the bottom. Use a spoon and/or your fingers to press the base mixture down really well, especially in the corners.
3. Place in the freezer while you make the first layer of filling.

The White Chocolate Filling
1 cup raw cashew nuts, soaked overnight and then drained
1 400ml can coconut cream
1/4 cup pure maple syrup
2 tsp vanilla bean paste/extract or powder
1/2 cup finely chopped and melted (double boiler style) cacao butter

1. Place the above ingredients into a blender and blend on high speed for several minutes. You need to blend long enough that the mixture is not at all gritty (under blended cashew nuts will make it so). It should be completely smooth. I personally blended for around 6 minutes. (perseverance is key!!!)
2. Remove the tin with the base from the freezer. Pour the white chocolate filling in over the top and return to the freezer for a minimum of 4 hours.

The Blueberry Filling 
1/2 cup raw cashew nuts, soaked overnight and then drained
200ml  coconut cream
3 tbsp pure maple syrup
3/4 cup blueberries (fresh or frozen) + handful extra

1. Place the blueberry layer ingredients into the blender and, as above, mix on high speed for several minutes until the mixture is not gritty and the cashew's are smoothly blended.
2. Remove the tin from the freezer. Take a small handful of frozen blueberries (unblended!) and put them in the tin on top of the white chocolate layer. Pour the blueberry layer over the top, making sure to cover all the whole blueberries (they're like a fun surprise when you cut the cheezecake!).
3. Return to the freezer for a minimum of 4 hours, preferably overnight. To serve, take a sharp knife and slice into bars, or squares (whatever takes your fancy!). Top with some extra blueberries.

*N.B. 'double boiler style' simply means taking a saucepan with a small amount of water, and placing a bowl over the top. Gently bring the water to the boil and, with the cacao butter in the bowl on top, stir until melted!


Spicy Dukkah Falafels.


I've always wanted to make my own falafels, but until now I never have because I thought it would be just too hard. How very wrong I was. 

I'm not sure why I thought things would be hard - there was no good reason for me to think that - but in all seriousness, you literally just require a blender or food processor, some fairly common ingredients (nothing too exotic or 'weird') and a fry pan. SIMPLE. 

I'm yet to travel to the Middle East, although I will be in a few short months (HELLO PERPETUAL FALAFELS!!!!) but thus far the best falafels I have ever eaten were to be found in the Coromandel Peninsula of New Zealand. In actual fact, as random as that location may be, it was those falafels that inspired me to make my own, so this recipe owe's its existence to that humble cafe on the beach. For a flavour punch, I decided to make dukkah falafels, which I think sets these apart from other recipes of a similar style. Arguably not wholly 'traditional', the dukkah takes these to the next level and, I'm most happy to report, tastier than those Coromandel falafels (this is clearly an objective opinion...). 

*N.B. 'dukkah' refers to a Middle Eastern spice and nut blend that is generally available in most supermarkets. As an Aussie, my recommendation is Table of Plenty, which is available in Woolworths and Coles. You can alternatively make your own (its quite simple, you just need a blender) - I'm sure a quick Google will yield some good results! 


Ingredients;
1 425gm can chickpeas, drained and rinsed well
1 cup coriander (or parsley, depending on personal preference)
2 tsp minced garlic
3 spring onions
2 tsp ground cumin
2 tsp paprika
2 tsp dried coriander (optional)
Pinch of salt (optional)
1 45gm packet of Table of Plenty dukkah (I used Spicy nut and spice blend)
3 - 5 tbsp flour (any works – I used wholegrain spelt)
Sesame seeds
Sesame seed oil 

Method;
1. After rinsing the chickpeas really well, place them in the food processor (blender will also work, though may require a little more persistence in scraping down the sides).
2. Roughly chop the coriander and shallots, and then add to food processor along with the garlic, cumin, paprika and dukkah. Process for a few minutes, or until everything is mixed well and there are no chunks of chickpea.
3. Add the flour 1 tbsp at a time and mix until the mixture is no longer wet and will hold its shape when rolled into a ball (and also won’t stick to your fingers!).
4. Place the mixture in a covered bowl in the fridge for 1 – 2 hours to firm up. Once chilled, roll the mixture into balls that are about the size of a tablespoon. When rolled, lightly press the balls into the sesame seeds on each side (optional, though looks and tastes great when serving). At this stage, lightly press the balls down to form more of a disk shape, rather than a ball.
5. In a large fry pan over medium heat, add a small amount of sesame seed oil. Cook each falafel for a few minutes on each side being careful not to burn. They should turn a golden brown colour and be completely warm the whole way through.
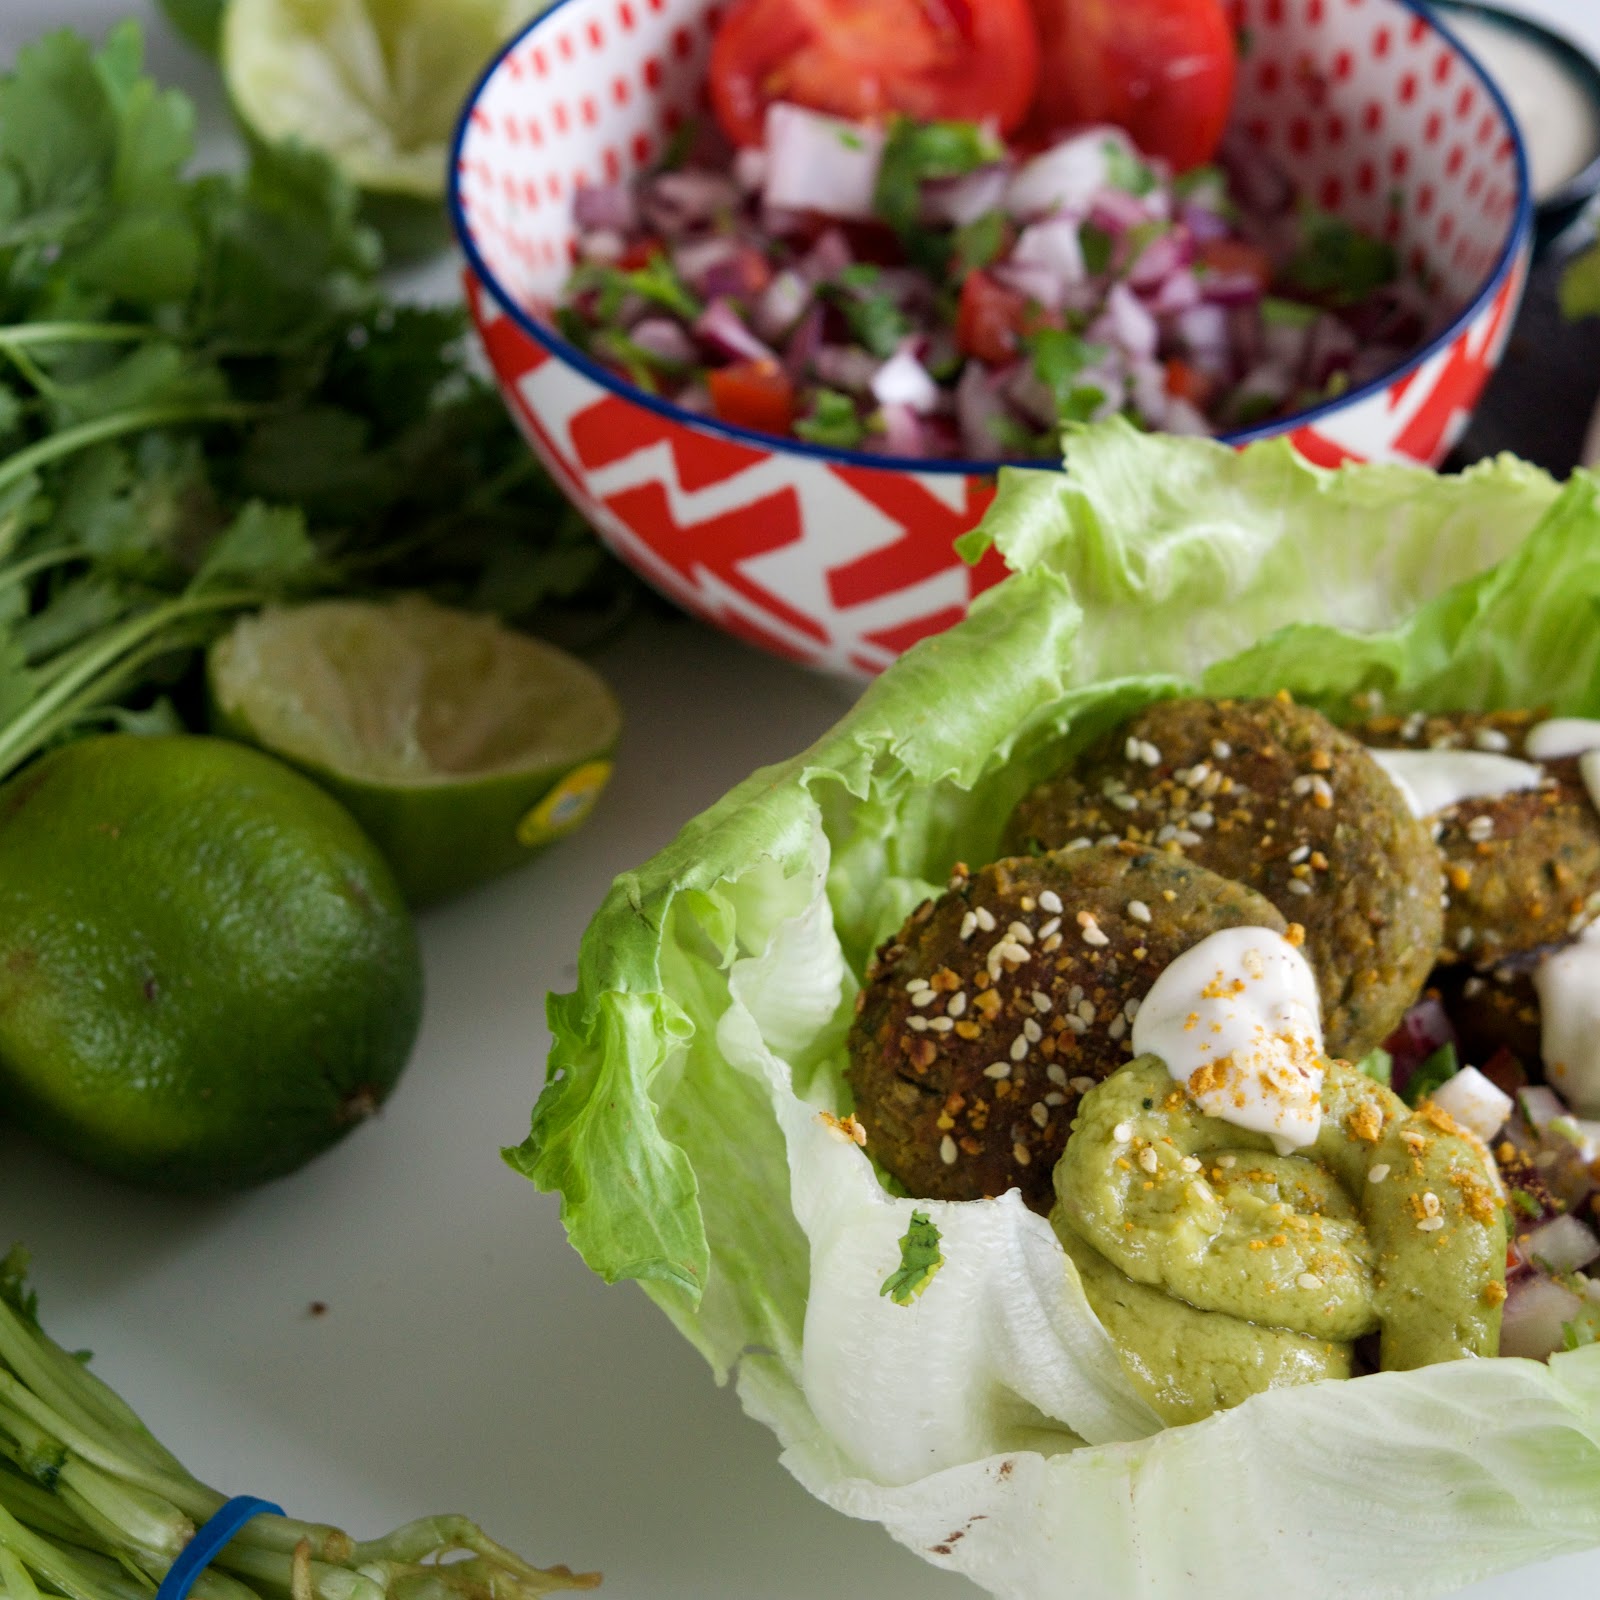
6. Serve in some iceberg lettuce cups with some finely diced tomato, red onion and coriander. Top with tahini and mashed avocado.


Friday, 15 April 2016

Soba Noodle Stir-Fry with Tamari Tofu and Veggies.


I'm slightly obsessed with stir-frys and noodles and tamari tofu and vegetables. I particularly like to combine all of these loves into one singular dish, which is basically what happened.

I also have instigated a new weekly goal. So, basically every Monday before I get out of bed, I set a goal for the week, or an intention. This week I decided to EAT MORE GREENS.

As a vegan, I eat relatively healthy as it is. I do a moderate amount of exercise, so I eat quite a lot of food and I'm mindful of the fact that whole grains, fresh fruit and veg and unrefined sugars need to form the majority of what I eat. That's not to say I don't indulge, and in actual fact you'll find me indulging almost on a daily basis, but in general the vast majority of what I eat is wholegrain carbs, like rice and pasta and fresh fruit and veggies. So, kind of by default, I guess I already eat plenty of greens as far as the standard person's food intake is concerned. But, there is always room for improvement, and that was my goal this week - to improve by eating more greens than I usually would.

Things have gone relatively well. though a goal such as this is something I feel I will continually work on. Nevertheless, I had some lunchtime cravings one day for noodles and tofu - i.e. not green vegetables. But, instead of just giving up on my goal, I decided to incorporate it into what I felt like eating, which is how this dish came to be.

This is a seriously good meal if I don't say so myself. Full of beautiful Asian-inspired flavours, fresh vegetables and the heavenly delight that is soba noodles, I'm fairly certain I've found a new dinner time staple!!


Ingredients;

The Tofu
125gm tofu
4 tbsp tamari (or reduced salt soy sauce - but use tamari if you're gluten intolerant)
Approx. 4 tbsp cornflower
2 tbsp sesame oil

1. Remove the tofu from the packaging. Use a sharp knife to slice the tofu into pieces approx. 0.5cm thick and 2cm wide - at least 6 pieces. Take a plate and lay some absorbent paper towel on the plate. Lay the pieces of tofu onto the towel and cover with another piece of absorbent towel. Place this in the fridge for about two hours with something heavy sitting on the top (i.e. a skillet or bottle of milk, etc.). Using something heavy is important in helping to drain the tofu of any excess water which will inevitably be stored in the tofu from its packaging. Soggy tofu will never go crispy and will not absorb flavour as well as properly drained tofu.
2. After approx. two hours retrieve the tofu from under previously mentioned heavy object. Grab a container that has a lid and lay the tofu strips into the container, then pour the tamari over the top. Depending on how large your container is you may need more tamari, because you should use enough to cover all the pieces so that they all absorb some of the sauce. Place the lid on and put the container in the fridge for at least a few hours (minimum) though the tofu will keep in the fridge.
3. When the tofu has  marinated, remove it from the fridge. On a chopping board, sprinkle the cornflower generously. Taking one strip of tofu at a time, cover it well in the cornflower, before gently dusting off any excess. Repeat for all the strips.
4. Take a fry pan and place it over the heat. You want quite a hot pan, so turn the heat towards the higher end of the spectrum. Pour approx. 2 tbsp sesame oil into the pan and allow to heat. Do not use olive oil as it doesn't handle such hot temperatures as well as sesame oil (coconut oil is also another option that will work well, although you will end up with quite a different flavour). Carefully place all of the strips into the pan and cook for a minute or two on each side until they are a light golden brown. When cooked, remove from the heat and place on a new sheet of absorbent towel to remove any excess oil.

*N.B. Alternatively, if you're in a hurry, use some pre-marinated tofu from the supermarket. 

The Stir Fry
180gm soba noodles  Approx. 10 stalks broccolini
Approx. 10 stalks asparagus
Large handful fresh snow peas
1 cup bean shoots
3 shallots, finely sliced
Handful fresh coriander
Sesame seeds (to serve)

The Sauce
3 cloves garlic, minced
2 tsp tamarind paste
1 tbsp coconut sugar
4 tbsp tamari
2 tbsp water
Juice of a fresh lime

1. Bring a saucepan of water to boil and cook the soba noodles as per the packet instructions. When cooked, drain and rinse.
2. Take a large fry-pan and drizzle in a small amount of sesame seed oil. Allow to warm up (on medium heat).
3. Meanwhile, chop the broccolini and asparagus stalks in half before putting them in the pan to cook.
4. Take a small, airtight container and add all the sauce ingredients. Put the lid on and shake vigorously to combine. Add half the sauce to the pan with the cooking veggies.
5. Cook the asparagus and broccolini for around 5 minutes before adding in the bean shoots, shallots, coriander and snow peas. Add in the pre-cooked tofu at this stage. Add in to cooked soba noodles and mix through along with the remainder of the sauce.
6. Serve with some additional fresh coriander, a squeeze of fresh lime juice and a sprinkling of sesame seeds!


Thursday, 7 April 2016

Coconut and Raspberry Wagon Wheels.


I'd like to take your tastebuds somewhere for a little moment.

Basically I want you to imagine a raspberry lolly, the kind most people loved like nothing else when they were young. I then want you to imagine a crispy and sweet coconut cookie, like something you're best friends grandma would bake and feed you endlessly whenever she saw you. Finally, like the literal icing on the cake, I'd like you to imagine a light and sweet coconut cream, the kind that would make you feel like you were in the Hawaiian Islands living it up like nobody's business. Now, put all of that together and imagine for just one second the insane taste sensation.

You can stop imagining now because I give to you my Coconut and Raspberry Wagon Wheels and your life will now never be the same again. Better yet, they're vegan, they're refined sugar free, and they are basically the best things ever.


Ingredients;
The Biscuits 
4 tbsp vegan butter
1/3 cup coconut sugar
1/3 cup coconut flour
2/3 cup wholemeal spelt flour
1/4 cup maple syrup (the pure stuff, not the artificially created nonsense!!)
2 tbsp rice malt syrup

1. Preheat a fan-forced oven to 160 degrees Celsius.
2. Using an electric mixer, combine the vegan butter and the coconut sugar on high speed until you have a smooth, creamy mixture.
3. Add in all the other ingredients and begin to fold them in together (I do this using the electric mixer, I just don't turn it on). When the flour is semi-mixed through, turn the mixer on low speed to combine. When the flour is relatively mixed in, increase to high speed and mix until well combined. (Alternatively, skip the folding and low speed stage and inevitably end up with flour legitimately everywhere...Yes, I have been there....)
4. Line a baking tray. Take roughly 1 tbsp of cookie dough and roll it in your (*clean*) hands to form a ball. Repeat until you have no mixture left.
5. When the mixture is all rolled out into balls, take the tray and, using your fingers or a fork, press down on each ball until it has a flat top - i.e. make it look like a pancake that's approx. 1cm thick. Place in the oven to bake for approx. 8-10 minutes. Keep a close eye on them so they don't burn. Remove from the oven when just lightly brown around the edges.
6. Allow to cool before assembling into wagon wheels.

The Coyo
2 400ml cans full fat coconut cream (do not buy the low fat version or this won't work!)
3 tbsp pure sweetener (maple syrup/agave syrup) 

1. Sit the cans in the fridge for a minimum of a few hours to allow the two parts of the cream to separate. 
2. After a few hours, open the cans and scoop out the creamy solid part into a bowl. DO NOT ADD ANY OF THE SEMI-CLEAR LIQUID PART OF THE CAN, because otherwise you won't get a cream, rather a watery, coconut-ty mess! 
3. Add the maple syrup and mix on high speed for a few minutes. 
4. Pour into a jar and refrigerate overnight before using. 

The Raspberry Jam
1 cup raspberries (fresh or frozen)
2 tbsp rice malt syrup
2 tbsp chia seeds

1. In a saucepan over low/medium heat, combine the jam ingredients. Allow to cook for a few minutes (long enough that any frozen raspberries are fully defrosted) and then scoop into a jar/air tight container and store in the fridge until use.

To assemble the wagon wheels, take a cookie and flip it upside down. Spoon a generous dollop of jam on and spread with a knife. Then, spoon on some coyo and top with another cookie. VOILA!! Store in the fridge (if they even last that long - not likely!!).


Friday, 18 March 2016

Smashed Avocado with Pear and Walnuts.


You could argue that this is a very strange combination, which is a thought that I wouldn't necessarily disagree with, but sometimes the best surprises come from where we least expect them and all I'm going to say is that this is one tasty combination!

I was inspired by the absolutely adorable baby pears that have been in the supermarkets in Australia lately. If you've never seen a baby pear, then please take my word for it when I say they're so damn cute that you'll just want to buy some to have in your kitchen/house to look at and marvel about the cuteness. I know this because this happened to me. I was grocery shopping and I chanced upon the baby pears and next minute, I found myself in possession of some baby pears. But, I'm very passionate about not wasting food, so now that I had the baby pears in my fruit bowl, I had to make something with them. 

Enter a craving for some smashed avocado, a rummage through the pantry to see what was there and a pot on my balcony full of thyme that is verging on out on control and voila! That's how this mighty delicious toast came to be! 

While this is a remarkably uncomplicated recipe - I mean, it is toast after all - I thought I'd put it in words for two reasons; 1. It's very tasty and good things should be shared, and 2. I have a multitude of assignments I should be doing, so naturally I have chosen to do anything but those aforementioned assignments. You're welcome. 


Ingredients;

Some bread to make some toast. This is rather open ended, and you could use any type of bread you like, with my personal preference and recommendation being for some multigrain sourdough
*N.B. if you're gluten intolerant, obviously please use a gluten free bread*

1 ripe avocado
1 baby pear/small pear
Cracked black pepper
Fresh thyme leaves
Handful walnuts, roughly chopped

1. This is all very simple. Basically you put the bread in the toaster, and while that's doing it's thing, chop the avocado in half, scoop the flesh out into a bowl, mash it with a fork, crack a little pepper in there too, mix it around. 
2. When the toast is cooked, spread the avo over the top, and then thinly slice the pear, layer it over the top and sprinkle with the chopped walnuts, thyme leaves and some extra pepper for good measure.
3. Hmmmm YUMMMMMM. 

Monday, 14 March 2016

Chocolate and Almond Butter Nicecream.


If ever there were a match made in heaven, then it would undoubtedly be chocolate and almond butter. If you've not yet enjoyed the delight that is this combination, then your life needs an overhaul because quite frankly, you are missing out. And, if you have tried this choc/almond heavenly combination before, then you will know of its goodness already and hopefully understand what I mean when I say I'm addicted.

But there's a wee little problem in that chocolate and almond butter aren't exactly the quintessential 'health foods'. See, the way I came to discover this great and outstanding combination of foods was actually through some new vegan ice-cream stocked in my local supermarket. Whilst delicious, ice-cream, chocolate and almond butter weren't exactly the foods that I wanted to be eating too much of, regardless of how delicious they tasted. So, I set out to make them into foods that I could eat lots of which wasn't very difficult because of the joy that is nicecream. (N.B. not a typo, as my mother thought it was.)

Nicecream is basically frozen banana, that's blended up and like magic it turns into a creamy, ice-cream like substance, yet healthy, hence the name 'nice' cream. Banana is unique in that the naturally occurring and healthy sugars in the fruit turn creamy and delicious when blended. Conversely, other fruit is often ice-like and watery when its frozen and blended. Additionally, a lot of skeptics (i.e. my housemate) don't believe me when I say that when you take nice cream and add other flavours, it genuinely does not taste like banana. To be truthful, this semi freaks me out because obviously it's made from banana, but when you add chocolate and almond butter, IT LEGIT TASTES JUST LIKE CHOCOLATE AND ALMOND BUTTER - i.e. delicious and creamy and amazing, sans fruity banana taste. What a dream. Don't believe me? Well, that's cool - the less you eat, the more banana, chocolate and almond butter there is in the world for me to eat, although in the spirit of sharing good things, I would 17/10 recommend you try this.


Ingredients;

2 large bananas, peeled and frozen overnight
2 heaped tbsp raw cacao powder
2 tbsp pure maple syrup
2 tbsp pure almond butter
3/4 cup coconut/almond milk

1. Remove the bananas from the freezer and chop them up. Add them to the blender along with all the other ingredients and blend on high speed for several minutes. The longer you blend, the creamier the nice cream will be, so I recommend blending until its well combined (a few minutes + a few scrapes down of the sides of the blender/persistence) and then blend for another few minutes for optimum levels of creamy deliciousness.
2. Scoop out of the blender and serve - my suggestions for toppings are my Chocolate and Hazelnut Granola and fresh berries!


Thursday, 28 January 2016

Double Chocolate Brownies with Berries. 


For quite a while now I've wanted to make some vegan brownies. Actually, I ought to clarify something there - what I really mean to say is that for quite a while I've wanted to eat some vegan brownies, which then brought about the need to cook them. Just thought I'd declare my true priorities first....

Now, obviously chocolate is good and essential to any brownie, but it's even better when you double the quantity, which is precisely what happened here. You're welcome.

Then, in what may seem like an attempt to add some fruit for 'health purposes', I added some blueberries and some raspberries. As you may or may not be aware, fruit, and indeed berries, are rather healthy with all those antioxidants and other things your body needs. Whilst the berries do certainly make this already relatively healthy brownie healthier, that was not the primary motivation for their addition to the chocolate creation. See, adding berries in takes the humble brownie and makes it truly amazing. Again, in case you are unawares, berries are freaking delicious and, when you add them to a brownie, make things oh so delicious and moist and flavoursome and wow that you cannot stop. I know because I did this, and I did not stop eating until all brownie was gone. Trust me, add the berries.

Chocolate. Doubled. Berries. Brownie.

And that my friends, is a short synopsis of why these brownies are great.


Ingredients;

80gm vegan butter (I used Nuttelex)
20gm almond butter (approx. 2 tbsp) 
1/2 cup raw sugar
2 cups flour (I used organic white flour)
3 heaped tbsp raw cacao powder
3 tsp baking soda
1 1/2 cups unsweetened plant milk (I used almond milk)
250gm dairy free chocolate chips
1 cup frozen raspberries
1 cup frozen blueberries


1. Preheat a fan forced oven to 180 degrees Celsius.
2. In a mixing bowl, beat the vegan butter, almond butter and sugar with an electric mixer until it is light and fluffy.
3. Add in the four, cacao, baking soda and plant milk and mix using an electric mixer unit everything is really well combined. If the mixture is a little too sticky/solid, add in a little extra plant milk. Add in the chocolate chips and two types of berries and gently fold them in using a spatula. 
4. Take a baking tin (I used a square tin, but any works) and line it with non-stick paper. Pour the brownie mixture into the tin and spread evenly. 
5. Bake for approx. 35-40 minutes. When cooked, a skewer inserted into the middle should come out clean and the brownie should be relatively firm to the touch. 
6. Allow to cool and then remove from the tin.
7. When serving, melt some dairy free chocolate to drizzle over the top along with some extra berries. Store in the fridge in an airtight container! 


Monday, 25 January 2016

Lime, Mint, Matcha, Kiwi and Coconut Popsicles.


Like every good culinary creation, these popsicles have a story. And, because it's a public holiday and I am bored, I shall share it with you all. You're welcome.

One day I was feeling a little bored, so as always in such a predicament, I found myself in the kitchen. I kind of secretly love being bored and in the kitchen because that's usually the time that my favourite recipes come to be - when I'm playing around with flavours and there's no time pressure (I would mega fail on any kind of cooking show for this reason!). Relaxed creating and cooking is definitely more my style.

But the story of these popsicles begins a few months back from that afternoon of boredom. See, one day I received a delightful email by a lovely little company based in Melbourne called - wait for it - Matcha Company, asking if I would like to try their product. It was super exciting for me because it was actually the first product that any company had sent me to try. Coincidently, or you could call it fate, I had only three days before that lovely email came through, been looking online to buy some matcha. It's one of those things that seems to majorly trend on social media and amongst the foodies and I have never even heard of it, let alone tried it. What is it you ask? Well.....me too. So, what a perfect chance for me to try some I thought!! So, the matcha made it's way via Australia Post to my kitchen. But that's where this story hit a little snag, because now that I had the matcha I quite frankly had no idea what to do next with it!

Fast forward a few months and there I was, very bored, in the kitchen, wanting ice-cream. This is a very, very frequent occurrence, because I flipping love ice-cream, so it was not entirely out of the norm for me to be there thinking about frozen snacks. Foolishly I had only just been to the supermarket that very morning and I had, most regretfully at that point in time, forgotten to buy any (dairy free) ice-cream for myself. So, as any good foodie in this situation would do, I decided to make some myself! Rarely for me, I did not feel like chocolate ice-cream, which is what these popsicles owe their existence to. Basically what eventuated that afternoon was some random blending of random things I hoped would taste good together, and here we are, a few months later with me having consumed far too many of these to count because, not meaning to toot my own horn, these taste downright delicious. They're definitely a favourite in my kitchen, and, delightfully, put that matcha to perfect use!! Double win!!!

*N.B. I AM SO SORRY THAT THIS RECIPE IS SO LATE IN COMING! I GENUINELY THOUGHT THAT I HAD UPLOADED IT BUT I EVIDENTLY BECAME DISTRACTED EATING POPSICLES THE AFTERNOON I WAS SUPPOSED TO TYPE IT UP AND BASICALLY ALL I HAVE TO SAY IS WHOOPS (and that the popsicles are legit that good that they possibly induce amnesia).


Ingredients;

1 400mL can coconut cream
2 tbsp matcha powder (available through Matcha Company or in most health food shops)
Zest and juice of 2 limes
1 large handful fresh mint
4 tbsp pure maple syrup
1 kiwi fruit

Toppings
Approx. 4 tbsp coyo (recipe here)
1 80gm block dairy free dark chocolate (I used Loving Earth)
Handful crushed pistachio nuts

1. Remove the leaves from the mint and place in a blender. Peel the kiwi fruit, roughly chop and also add to the blender. First remove the zest from the limes, then juice (far easier doing the zesting first - trust me!) and also add that to the blender, along with the matcha powder, coconut cream and maple syrup. Blend on high speed for a few minutes - you want this to be really well combined with no large chunks of mint leaves, the smoother the better!
2. Take some popsicle moulds* and carefully pour the mixture into the moulds. Place in the freezer for a few hours until fully set.
3. When set, remove the popsicles from the moulds. Some hot water on the outside of the mould helps to make this easier, otherwise brute force it is!
4. Melt the chocolate in a small bowl and then, take a small container and place the coyo in there. Dip each popsicle into the coyo to coat the top half (or third). Lay the dipped popsicles out on some non-stick paper and then drizzle (generously) with the melted chocolate. Sprinkle with some pistachio nuts and then return to the freezer to set. Store in an airtight container in the freezer if they even last more than 30 minutes (unlikely...).


Thursday, 14 January 2016

How To Travel with a Particular Dietary Requirement or Preference.

This is literally my favourite sight in the world - looking out the plane window over the clouds and the undiscovered places below. I'm definitely a window seat girl to the core.
I have two addictions in life that become quite strikingly obvious within the first five minutes or so after you meet me; food and travel. But, sometimes those two loves don't exactly cooperate nicely given that I have a dietary preference for vegan food. Whilst I will go to fairly great lengths to only eat vegan friendly food, for some people, eating a certain way can mean life and death - such as for a coeliac. I'm fairly blessed to have travelled quite a lot in recent years, from Europe, to Asia, back to Europe and closer to home in the Pacific, so I kind of like to consider myself a bit of a pro when it comes to finding places to cater to niche food requirements and preferences. For many, this is the nightmare of travel, but it need not be that way because finding food you can and will eat isn't as hard as you might think! Here's a few tips and tricks that I've learnt along the way;

1. Ask your Friends who've Travelled There Before/Friends who have the same Dietary Requirement/Preference as you.
Without fail the easiest way to travel with a dietary requirement or preference is to ask for advice from others in the same position as you who might have been to the city/country you are heading before. See, usually your gluten intolerant friends who've been to Paris themselves will have battled the food scene there and they'll know exactly where you ought to head to get your gluten free fix. The benefit in friends advice is that they've obviously been there beforehand, so if it was god-awful then they're the unfortunate souls who had to eat the food, and they'll likely tell you it is or isn't worth the trip!

The spread at Sadhana Kitchen in Newtown, Sydney. I had a friend who had been here before and she insisted that I absolutely MUST go. That raw vegan lasagne was the actual next level. I'm still dreaming about it and its been 5 months....
2. Ask Google.
In the place of having no friends who might've been to the place you're heading (hello trip to Riga earlier this year...), ask everybody's best friend, Google. As the famous proverb goes, Google knows everything, including where the good vegan restaurants are and whether gluten free is a thing that exists in Thailand. The downside to Google? Well, it won't always tell you if the restaurant is good or bad as a friend might, so sometimes its a bit of a gamble, but half the fun in travelling is the stories of failure you can share later on!!! Happy Cow is my go-to website for all things vegan and veto - 11/10 would recommend! You simply search the city/town you're in and voila - there's a lovely little list with all the places you could go!

Cheers to Google for enlightening me to the fact that in Krakow one can get vegan ice-cream and sorbet. LIFE IS GOOD.
3. Check Instagram, particularly Hashtags.
A lot of people aren't aware that Instagram is actually kind of like a food encyclopaedia to basically everywhere and anywhere on the planet if you know how to navigate your way through the various insignificant hashtags to the ones that matter when travelling. In actual fact, I think I've probably found more places to eat through Instagram than friends, books and Google combined! See here's how it works. Say you're going to travel to Greece and you'll be in Athens and you're a vegan. What you want to do is jump on Instagram, chuck a sneaky follow to me over at @young_rebecca and then jump on the search page and type in #veganathens and see what comes up. Sometimes you'll be inundated with home chefs who coincidently call Athens home, but frequently you'll also find pictures people have posted from restaurants around the city, and, if they're really helpful, they'll have also tagged/checked in at the restaurant itself, so all you have to do is click on the location tag and voila! You have yourself a vegan or a vegan friendly restaurant. Oh the power of social media!!! Also keep in mind that if you have found somewhere vegan or vegan friendly and you post a picture of the meal there, also tag the location and #vegan__ <-- city you're in so that other people can use this trick too! Helpful hashtags include; #vegan(name of city), #glutenfree(name of city), #(name of city)vegan, etc.

4. Ask the Locals!
No body knows a place like someone that lives there. So, the best people to ask for food suggestions, especially if they're a little less common, are going to be the locals. Determining who is a local and who is not is probably the hardest part to this, but you'll never know unless you do ask. Speaking the language is also potentially a barrier here but when you have nothing to lose you may as well be polite and ask if they speak the same language as you and if the answer is yes then proceed with asking where the best vegetarian food in town can be found!!!

I'm that strange person that asks the hotel receptionist if they can recommend their favourite supermarket juice to me. Weird? Yes. Good juice? YES. Would recommend 'Giraffe' juices for anyone ever in Lithuania. 11/10.
5. ASK.
In addition to asking the locals, also just ask anyone and everyone, even if they're also carrying about a massive digital camera and guide book with a large neon flashing sign saying 'tourist' on their head just like you - who knows, maybe they share your funny dietary quirks too. I recently travelled for over a month across north-eastern and central Europe completely alone. Yep, just me, myself and I for company. And, if there is one thing that I learnt in the whole experience it was that you just need to ask! I've always had a fear of asking strangers things, which is becomingly increasingly enhanced the more and more we rely upon the Internet, but when I found myself completely alone with no one to give me judge-y side eye (a fear of mine), I suddenly found myself asking people everywhere for things and some of the best experiences, restaurants, day trips, transport options and more were shared this way! The worst that someone can do is either say 'I can't help you', not understand you in whatever language you ask and give you a kinda funny look (but hey, you never have to see them again) or say no. No one grows a second head to eat you, no one yelled at me (in my experiences) and 9.8 times out of 10, people gave me advice and answers that were actually helpful! So, if you are after a gluten free restaurant, politely ask a passerby if they know where you might find one, and if they don't know, then ask the next passerby, or your hotel receptionist, or a tourist information desk, etc.!

So I really wanted this falafel wrap this one time in Helsinki but I wasn't sure if it was vegan and it was all very stressful and then I was just like 'Stuff it! I'll ask!' So I did ask, and as all good happy endings go, it was vegan, so I ate 8 in the space of 2 days.
6. Google Translate your Particular Needs/Preference BEFORE YOU LEAVE THE WIFI.
This one day not too long ago, I found myself in Northern Thailand, and, you guessed it, I was hungry and eagerly attempting to hunt down a restaurant that could make me something vegan. But, I do not speak Thai, and the small town I happened to find myself was not overly Westernised, meaning that English was rarely understood and spoken. In Thai, (as far as I am aware) the word 'vegan' roughly translates to sound something along the lines of 'Mangswirati' - i.e. NOTHING AT ALL LIKE THE ENGLISH WORD. With the gift of hindsight I can tell you this, but at the time I had no idea at all, so I actually ended up eating some plain rice and stir-fried veggies, which was fine, although I very much believe that had I been able to accurately express what I wanted, I could've had many more options. So, the moral of the story here is that Google Translate is your friend, and if you are travelling to a country where you do not speak the language, always translate your dietary requirements/allergies/preferences and save them as a note in your phone beforehand so they are easily accessible when you're out and about without wifi!


7. Hit up the Local Farmers Markets and Supermarkets.
I LOVE FARMERS MARKETS. I feel this is part of the reason I am so in love with Europe because they always just seem to pop up all over the place and it's honestly one of the best things ever! Farmers markets usually stock a whole heap of fresh, easily identifiable, and, most importantly, CHEAP, produce meaning that if you are intolerant of something, because the markets haven't yet crafted something into a dish with about 50 different ingredients, you can be certain that the raspberries do indeed only contain raspberry whereas the meal in the restaurant could be hiding things. One of my top tips for all travellers, not just those with food fetishes, is the classic picnic - first stop always being the famers market. I mean, look me in the eye and tell me with full conviction that there is something better than fresh berries grown in the countryside, a crusty loaf of fresh sourdough and some other bits and pieces under a shady tree in the summer. You cannot. No body can. Because there is nothing better. And, if you're doubting me then you evidently have not been to the farmers market in summer, in which case I refer you to this little paragraph!

Fresh German raspberries at the market in Bamberg? YES PLEASE.
Being the curious mind that I am with the never-ending desire to see more and go to more places, these points will no doubt be added to in the future, although I do think they make an excellent starting point!! Travel freely fellow wanderlusting souls!!! Not all who wander are lost.

Saturday, 9 January 2016

Pear and Avocado and Candied Walnut Salad.


It may surprise you to hear that I am not a fan of salad. This is obviously kinda contradictory to my site given everything I share here, and indeed everything that I eat, is meat free, dairy free, and vegan, which lead most people to think that the only possible food that could be all those things, and therefore on this site, is salad. I hate to break it to you all, but that is WRONG. In actual fact, I'm known to be quite anti-salad, with the exception being for tasty salads only. No boring lettuce allowed.

This salad was a creation initially conceived for my family Christmas lunch in 2015. We were having a big gathering and everyone was tasked with bringing a plate to share, and I was put on salad duty. Whilst initially less-than-impressed with that, turns out it was good fortune because it is from that obligation as salad-lady that this delicious creation was born, complete with candied walnuts (yum), avocado (YUM) and a wickedly good hummus/avocado dressing (YUMMMMMMM).


Ingredients;
(makes 1 large salad)

Several large handfuls mixed salad greens (approx.)
2 handfuls rocket (arugula)
1 red onion, finely sliced
1 whole avocado, finely sliced
Handful fresh coriander
4 shallots, thinly sliced (spring onions)
1 pear, finely sliced (I use a julienne slicer, but thin strips with a sharp knife also works)
1 cup walnuts
3 tbsp pure maple syrup
1 tbsp coconut oil

The Dressing
3 tbsp hummus
1/2 avocado
2 tsp sesame seed oil
1 lemon, juiced
Small handful fresh spinach

1. Preheat a fan-forced oven to 150 degrees.
2. In a small bowl, mix the walnuts, coconut oil and the maple syrup. Then, take a lined baking tray and spread evenly over the tray. Place in the oven for approx. 10 minutes, or until slightly crunchy.
3. While the walnuts are cooking, take a large bowl and combine the mixed lettuce, rocket, onion, coriander, shallots and pear. Then, add in half the sliced avocado and use your (clean) hands to mix everything together.
4. In a blender, combine the Dressing ingredients (hummus, avocado, lemon juice, sesame seed oil and spinach). Blend on high speed for a minute or two until well combined and beautifully green.
5. To serve, mix the candied walnuts through the salad. Plate up the salad and served garnished generously with the hummus/avocado dressing, some extra avocado (no such thing as too much avo) and if you're feeling particularly fancy, some micro herbs!