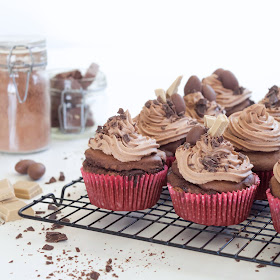
I've said it before, and I will say it again - vegan baking can be a very hit-or-miss exercise, generally more on the 'miss' side of things than the 'hit'! I've suffered many the baked disaster in my time, but I've finally cracked the winning formula, which was initially unearthed through my The Perfect Vanilla Cake recipe. I decided to hack that recipe though, if you would call this hacking, because I cannot put into words how much I love a good chocolate cupcake and since becoming a vegan a few years ago, I've only rarely chanced upon a good one. I am most proud to declare that not only have a found a genuinely good chocolate cupcake, but I have actually made that very cupcake! You know how usually you find something good and like, it's only available on the complete other side of the world and that makes more maximum inconvenience and hopeless lusting after that unattainable food? Maybe not actually. Reading that back I do sound a bit weird... ANYWAY! The point is that the tasty chocolate cupcakes are very much within your reach - they're easy to make, they're very very tasty and they're, quite frankly, an excellent vegan recreation of an all-time classic baked food!
Ingredients;
125gm vegan butter (I use Nuttelex)
1/2 cup raw sugar
3 tbsp aquafaba (the liquid from a can of chickpeas)
3 tsp vanilla bean paste
1 1/4 cups soy milk
2 cups flour (I use white spelt) (sifted)
3 tbsp cacao/cocoa
1 tsp baking powder
1 tsp bicarb soda
1. Preheat a fan-forced oven to 180 degrees Celsius.
2. Take a large mixing bowl and place the vegan butter, raw sugar and aquafaba into it. Using an electric mixer, mix the three together for 5 minutes. It's important to mix for the entirety of that time as this step is what makes the cake light and fluffy.
3. After the butter, sugar and aquafaba has combined into a thick, creamy and slightly fluffy mixture, add in the vanilla bean paste, then mix again with the electric mixer for a minute or two.
4. Add the soy milk and half the flour to the bowl. Use a spatula to gently fold the mixture together. It's important to use the spatula so that you don't lose all the air the mixture gain when you mixed for the 5 minutes initially.
5. After the mixture is mostly combined, add in the second half of the flour along with the baking powder and bicarb soda, again gently folding the mixture in together until everything is well combined.
6. Pour the mixture out into a muffin tin (lined with some muffin casings!). Place in the oven for approx. 20 - 25 minutes, keeping an eye on things to make sure things aren't burning. You should be able to press down lightly on each cupcake and they'll hold their own shape and not cave in when they're cooked.
7. Remove them from the oven and allow them to cool before transferring the cupcakes out onto a cooling rack.
Icing
(This is the real cream-de-la-cream, if you will, of the recipe and yeah I have been sneaking sneaky mouth fulls straight from the icing bag I have left over in my fridge...)
2 cans coconut cream, placed in the fridge overnight
1/2 cup icing sugar
50gm high quality dark chocolate
1. Remove the cans carefully from the fridge, being mindful not to disturb the contents. Open them, and you should be able to separate the cream part from the coconut water. This is a delicate operation, and the longer the cans have been in the fridge, the easier this will be. Scoop the cream (JUST THE CREAM!) into a mixing bowl.
2. Add the icing sugar to the bowl and then using an electric mixer, combine on high speed for a minimum of 5 minutes. The length of time you mix is important, as just with the cake, it will make things light and fluffy which is precisely what you want/need in a good icing!
3. Melt the chocolate (I recommend double-boiler style - i.e. using a saucepan on the stovetop with some water in the bottom, and then placing a bigger bowl on the top to melt the chocolate in).
4. When the chocolate is melted, pour it out into the bowl with the mixed coconut cream and icing sugar, then mix all three things together for a further few minutes.
5. Place the icing in the fridge for a few hours to set further.
6. When the icing has cooled and thickened a bit, scoop it out and directly onto each cupcake, or alternatively use a piping bag for some extra pizzaz. Sprinkle some grated chocolate on over the top and voila! DELICIOUSNESS!
Store the cupcakes in an airtight container in the fridge.


No comments:
Post a Comment